Getting Started with Microsoft PowerPoint 2010
PowerPoint 2010 is one of the most frequently used Microsoft Office 2010 applications and therefore while reading on you will find out basic information about this application and its amazing new features. Along with these the differences of the previous versions like PowerPoint 2007 will also be talked about.
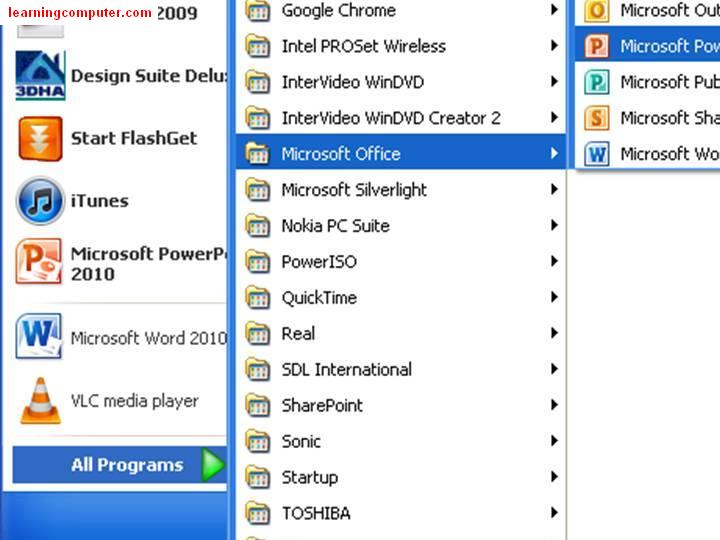
Since PowerPoint 2010 is used widely and frequently for demos and presentations, those who are in the same situation should have an easy and instant access to the Office 2010 software. There are several ways of opening a new presentation and below is the route to follow which shows the most basic way of opening a new Power Point 2010 document.
Start → All Programs → Microsoft Office → Microsoft PowerPoint 2010
Here is the visual representation of how to open a fresh presentation.
Ways of Adding New Slide to PowerPoint 2010 presentation
Once you have opened a new PowerPoint 2010 presentation and want to create a slide show you should first start with adding the title and the text that you want to have in your application presentation. You should then be able to add a new slide to an existing PPT presentation and here is how you can do it.
The Ribbon of PowerPoint 2010
The Ribbon of PowerPoint 2010 consists of File, Home, Insert, Design, Transitions, Animations, Slide Show, Review and View tabs which all have related groupings to provide the users of this application with many
What is PowerPoint – On the Microsoft PowerPoint 2010 Tutorial you will learn to use Transitions, Animations, Templates and Backgrounds to produce highly attractive PowerPoint 2010 slide shows
Below is a screenshot to show how the ribbon of PowerPoint 2010 in Office MS 2010 looks like and its tabs. 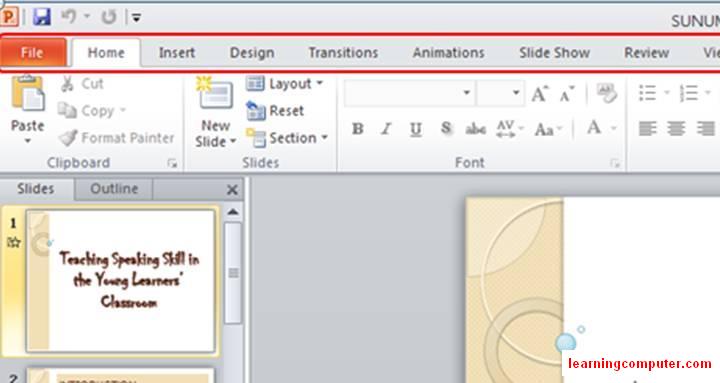
Visual representation of how the ribbon of Power Point 2010 should look like.
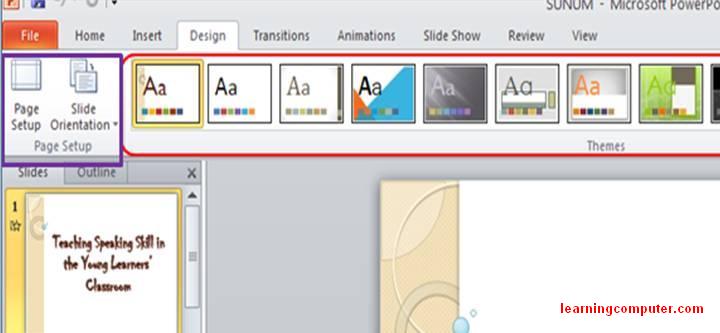
The application has a tab called Design tab which is actually one of the most important new features to look closer. Design tab of PowerPoint 2010 consists of many groups which enable those who produce slide shows, demos or presentations to come up with highly professional results. The groups of Design tab of Power Point 2010 are Page Setup, Themes and Background. These groups are actually one of the most frequently used ones since they enable the produced document to be made visually appealing and attractive to the end users.
Within the Themes group there are many different ready templates that can be used or one can simply create their own theme to use within the PowerPoint 2010. Some names of the ready theme templates are Office theme which suggests that it can be used for presentations that are used in offices and also themes called Austin, Black tie and many others are available to be discovered while using this application. One can also change some of the new features of these ready to go theme templates and this may be a good idea for those designers who in general like a ready theme ppt template but prefer to change a few things about it especially some colors. This can be done by clicking on the Colors drop down button which is placed within the Themes group of Design Tab of PowerPoint 2010. There is also a Font drop down button available so one can also change the fonts of the text that is entered to a slide show.
Below is a screenshot which show how the Design tab looks like.
Transitions Tab of PowerPoint 2010
The Transitions tab of PowerPoint 2010 has groups called Preview, Transition to this slide and Timing which enable users of PowerPoint 2010 to add transition effects to slides and to adjust the timing between transitions from one slide to another. Along with these one can also add some sounds to their slide shows to make them a lot better. Below is a screenshot to show how the Transition tab and its groups look like in office Microsoft 2010.

Animations Tab of PowerPoint 2010
Animations tab is another one of the great features of PowerPoint 2010 and it offers a wide range of animation options. The animations of PowerPoint 2010 have been designed and ordered in a way that would easily provide Microsoft PowerPoint 2010 users with an instant access to all the animation selections and features. Those who are creating a slide show or presentations would definitely want to use the suitable animations and for those who want to add animation to their presentations, all they have to do is to add the text and the pictures they want to include in their slide show and they click on Animations tab and there you will see the groups Preview, Animation, Advanced Animation and Timing.

The Animations in 2010 Microsoft Office PowerPoint tab has a group called Animation which consists of a wide range of animation options. Those who are using PowerPoint 2010 to create professional slide shows, presentations and so on, all that one has to do is to click on Animations and then click on the drop down button of Animation group. With PowerPoint 2010 you can use many different animations and set the time according to your preferences.
Below is a visual representation of how the Animation group of PowerPoint 2010 looks like once one clicks on the drop down button. A screenshot to show the animation varieties of Power Point 2010 is shown right below.

Adding Audio files
PowerPoint supports multimedia in the slides. You can add audio or video clips to the slides which can be played during the presentation.
The following steps will help you add audio or video file to the slides.
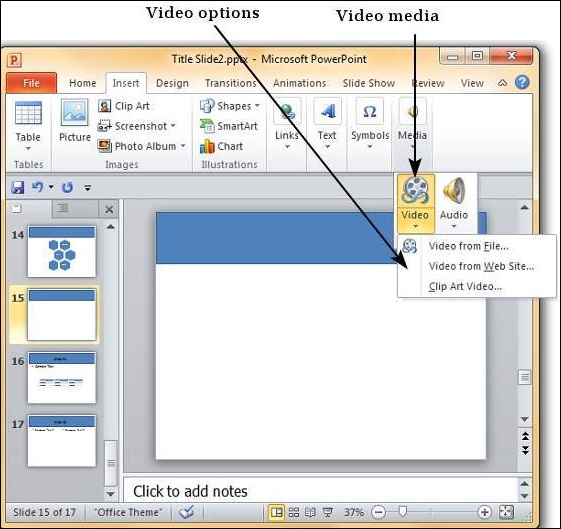
Step 1 − Go to the Media group under the Insert ribbon
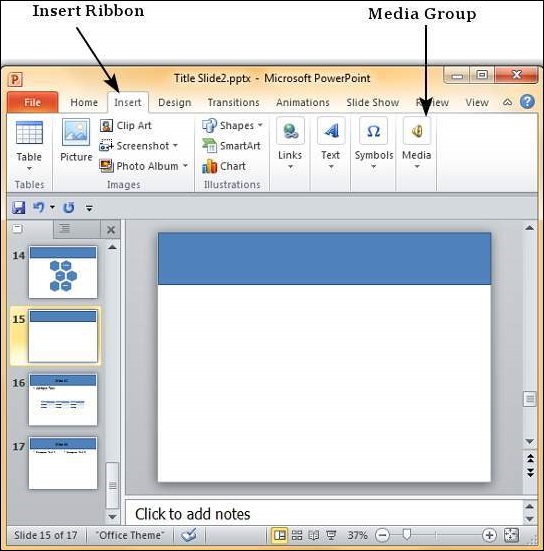
Step 2 − To insert video file select Video as media type and Video from File to insert a video from your computer or hard drive.
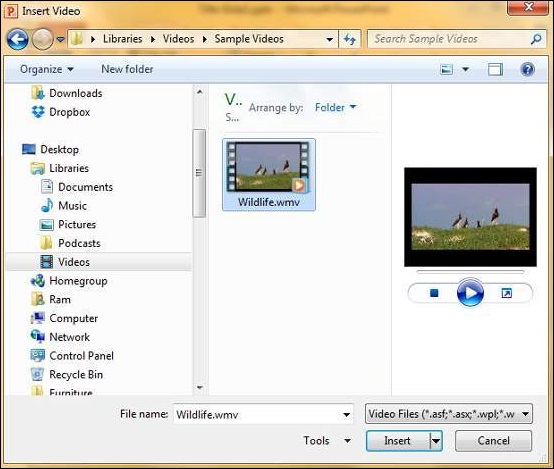
Step 3 − In the Insert Video dialog, browse for a video file and click Insert.
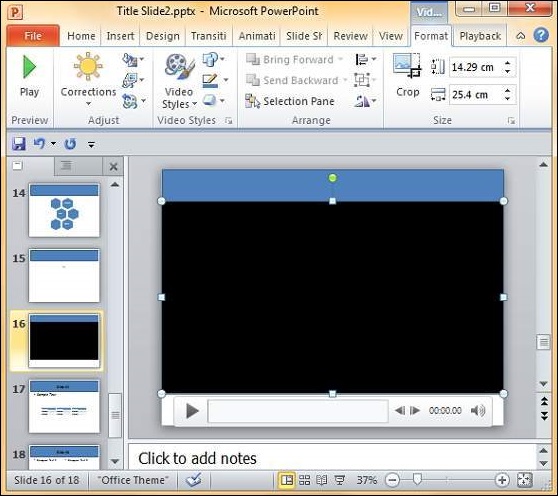
Step 4 − You will now see that a Video file is added to the slide.
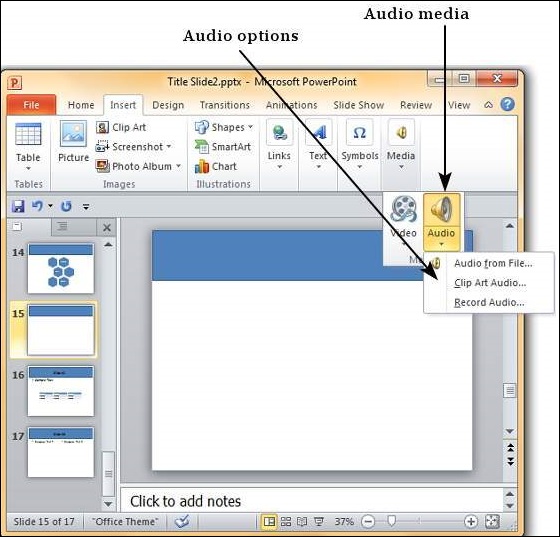
Step 5 − To insert audio file select Audio as media type and Audio from File to insert an Audio from your computer or hard drive.
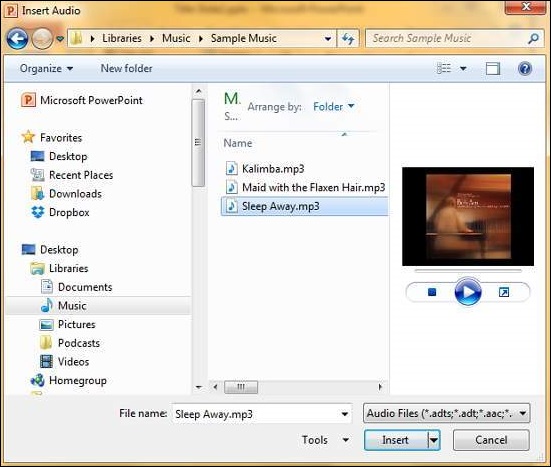
Step 6 − In the Insert Audio dialog, browse for an audio file and click Insert.
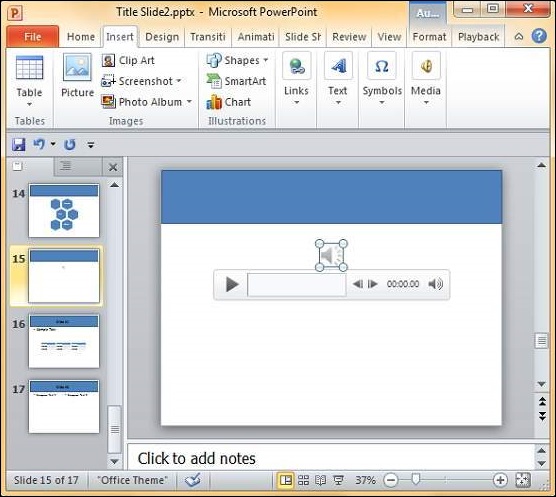
Step 7 − You will now see that an Audio file is added to the slide.
|
A. Tick the correct
answer. |
|||
|
1. This is the way a slide arrives on the screen. |
|||
|
a) Transition |
b) Theme |
c) Animation |
|
|
2. Which of the following helps you to add graphics to your
presentation? |
|||
|
a) MS Word |
b) SmartArt |
c) Animation |
|
|
3. You can find List and Pyramid graphics under this option of
the Insert tab. |
|||
|
a) SmartArt |
b) Slide Show |
c) Animation |
|
|
4. This option is used to add your personal audio file. |
|||
|
a) Record Audio |
b) Audio from file |
c) Personal file |
|
|
5. These are default themes and text arrangements in PowerPoint. |
|||
|
a) Themes |
b) Templates |
c) Presentations |
|
|
6. Which of the following can you add to your presentation? |
|||
|
a) Audio |
b) Video |
c) Both |
|
|
7. Which of the following can you add to your presentation? |
|||
|
a) Microphone |
b) Speakers |
c) Headphone |
|
|
8. Which key is used to end to slide show? |
|||
|
a) Esc key |
b) Space bar |
c) Enter key |
|
|
9. This feature can make the text grow larger in a presentation. |
|||
|
a) Audio |
b) Transition |
c) Animation |
|
|
B. Fill in the
blanks. |
|||
|
1. PowerPoint templates have file extension as ___________. |
|||
|
2. ____________ adds movement to your sides as you move from one
side to another. |
|||
|
3. You can slow down a transition by increasing the _________
tab. |
|||
|
4. The audio button is found under the _________. |
|||
|
5. The sequential display of slides is known as slide ________. |
|||
|
6. Choosing the _________ option, the animation starts on
clicking the mouse. |
|||
|
7. The _________ icon appears on a slide to show that an audio
is a part of the file. |
|||
|
8. Click on the _________ button to start recording the
narration. |
|||
|
9. You can add ________ to a presentation in your own voice. |
|||
|
C. Match the
columns. |
|||
|
1. Transition |
a. Press F5 |
||
|
2. Animation |
b. Adding movement to slides |
||
|
3. Slide show |
c. Graphics |
||
|
4. SmartArt |
d. Visual effects |
||
|
5. Trim |
e. Default text arrangement |
||
|
6. .potx |
f. Remove a portion of an audio/video file |
||
|
7. Template |
g. Remove narration |
||
|
8. Clear |
h. PowerPoint template |
||
|
E. Give the answer
in one word. |
|||
|
1. The tab used to modify a SmartArt. |
|||
|
2. A type of SmartArt graphic that allows you to display
flowcharts. |
|||
|
3. The tab used to adjust audio file on a website. |
|||
|
4. The option used to insert link to a video file on a website. |
|||
|
5. The key used to remove an audio file from a slide. |
|||
|
6. The tab used to add narrations to a slide. |
|||
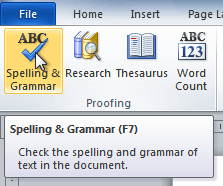
- Go to the Review tab. Click on the Spelling & Grammar command.
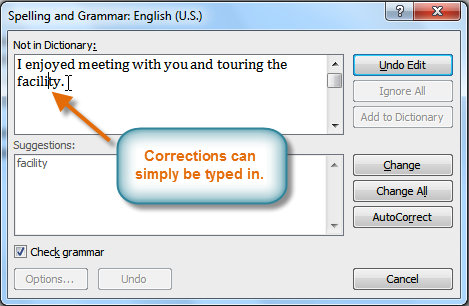
- The Spelling and Grammar dialog box will open. For each error in your document, Word will try to offer one or more suggestions. You can select a suggestion and click Change to correct the error.
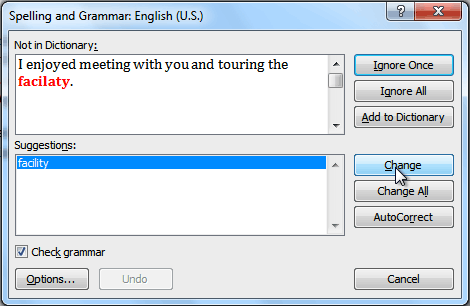
- If no suggestions are given, you can manually type the correct spelling.
Ignoring "errors"
The spelling and grammar check is not always correct. Particularly with grammar, there are many errors Word will not notice. There are also times when the spelling and grammar check will say something's an error when it's actually not. This often happens with people's names, which may not be in the dictionary.
If Word says something is an error, you can choose not to change it. Depending on whether it's a spelling or grammar error, you can choose from several options:
For spelling "errors"
- Ignore Once: This will skip the word without changing it.
- Ignore All: This will skip the word without changing it, and it will also skip all other instances of this word in the document.
- Add to Dictionary: This adds the word to the dictionary so it will never come up as an error. Make sure the word is spelled correctly before choosing this option.
For grammar "errors"
- Ignore Once: This will skip the "error" without changing it.
- Ignore Rule: This will skip this "error" and all other instances that relate to this grammar rule.
- Next Sentence: This skips the sentence without changing it and leaves it marked as an error. This means it will still show up if you do another spelling and grammar check later on.
Automatic spelling and grammar checking
By default, Word automatically checks your document for spelling and grammar errors, so you may not even need to run a separate spelling and grammar check. These errors are indicated by colored wavy lines.
- The red line indicates a misspelled word.
- The green line indicates a grammatical error.
- The blue line indicates a contextual spelling error. This feature is turned off by default.
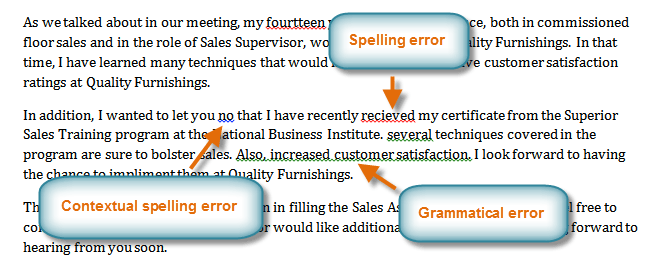
A contextual spelling error occurs when the wrong word is used but the word is spelled correctly. For example, if you write Deer Mr. Theodore at the beginning of a letter, deer is a contextual spelling error because dear should have been used. Deer is spelled correctly, but it is used incorrectly in this letter.
To use Mail Merge:
- Select the Mailings on the Ribbon.
- Select the Start Mail Merge command.
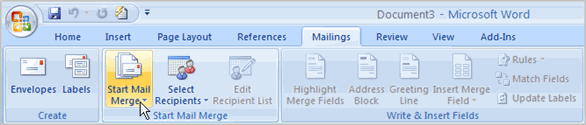
- Select Step by Step Mail Merge Wizard.
The Mail Merge task pane appears and will guide you through the six main steps to complete a merge. You will have several decisions to make during the process. The following is an example of how to create a form letter and merge the letter with a data list.
Steps 1-3
- Choose the type of document you want to create. In this example, select Letters.
- Click Next: Starting document to move to Step 2.
- Select Use the current document.
- Click Next: Select recipients to move to Step 3.
- Select the Type a new list button.
- Click Create to create a data source. The New Address List dialog box appears.
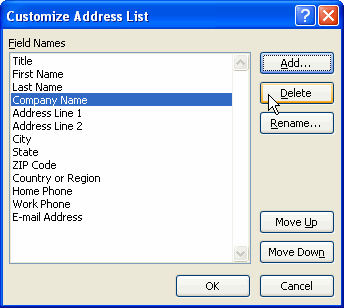
- Click Customize in the dialog box. The Customize Address List dialog box appears.
- Select any field you do not need, and click Delete.
- Click Yes to confirm that you want to delete the field.
- Continue to delete any unnecessary fields.
- Click Add. The Add Field dialog box appears.
- Enter the new field name.
- Click OK.
- Continue to add any fields necessary.
- Click OK to close the Customize Address List dialog box.
To customize the new address list:
- Enter the necessary data in the New Address List dialog box.
- Click New Entry to enter another record.
- Click Close when you have entered all of your data records.
- Enter the file name you want to save the data list as.
- Choose the location where you want to save the file.
- Click Save. The Mail Merge Recipients dialog box appears and displays all of the data records in the list.
- Confirm that the data list is correct, and click OK.
- Click Next: Write your letter to move to Step 4.
Steps 4-6
- Write a letter in the current Word document, or use an open existing document.
To insert recipient data from the list:
- Place the insertion point in the document where you want the information to appear.
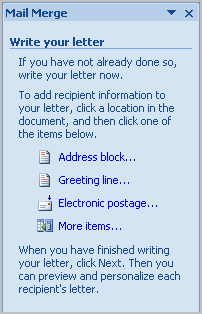
- Select Address block, Greeting line, or Electronic postage from the task pane. A dialog box with options will appear based on your selection.
- OR
- Select More Items. The Insert Merge Field dialog box will appear.
- Select the field you want to insert in the document.
- Click Insert. Notice that a placeholder appears where information from the data record will eventually appear.
- Repeat these steps each time you need to enter information from your data record.
- Click Next: Preview your letters in the task pane once you have completed your letter.
- Preview the letters to make sure the information from the data record appears correctly in the letter.
- Click Next: Complete the merge.
- Click Print to print the letters.
- Click All.
- Click OK in the Merge to Printer dialog box.
- Click OK to send the letters to the printer.
The Mail Merge Wizard allows you to complete the merge process in a variety of ways. The best way to learn how to use the different functions in Mail Merge is to try to develop several of the different documents—letters, labels, and envelopes—using the different types of data sources.Now watch the videoVideo 01
Video 02
Assignment:A. Choose the correct option from the options given below. 1. The spelling and grammar command is available under the_______.
a) Review
b) References tab
c) Home tab.
2. Which wavy line shows grammatical mistakes?
a) Red
b) Green
c) Blue
3. Which feature is used to view antonyms and synonyms of a word?
a) Spelling Grammar
b) Thesaurus
c) Mailings
4. Which feature is used to send a personalized letter to many people.
a) Spelling
b) Thesaurus
c) Mail Merge
5. Under which tab is the mail merge option found?
a) Home
b) Mailings
c) Insert
C. Fill in the blanks.
1. The ________ line indicates a contextual error.
2. _________ key is pressed to open the spelling and grammar dialog box.
3. The thesaurus feature is preset under the __________ tab.
4. The Start Mail Merge command is found under the _______ tab.
5. There are _________ main steps to complete a mail merge.
D. Match the following.
1) Synonym
a) Spelling and grammar
2) F7
b) Personalized letters
3) Mail Merge
c) Opposite meaning
4) Red wavy line
d) Thesaurus
5) Antonym
e) Status bar
6) English(U.S)
f) Spelling
| A. Choose the correct option from the options given below. | ||
1. The spelling and grammar command is available under the_______. | ||
a) Review | b) References tab | c) Home tab. |
2. Which wavy line shows grammatical mistakes? | ||
a) Red | b) Green | c) Blue |
3. Which feature is used to view antonyms and synonyms of a word? | ||
a) Spelling Grammar | b) Thesaurus | c) Mailings |
4. Which feature is used to send a personalized letter to many people. | ||
a) Spelling | b) Thesaurus | c) Mail Merge |
5. Under which tab is the mail merge option found? | ||
a) Home | b) Mailings | c) Insert |
C. Fill in the blanks. | ||
1. The ________ line indicates a contextual error. | ||
2. _________ key is pressed to open the spelling and grammar dialog box. | ||
3. The thesaurus feature is preset under the __________ tab. | ||
4. The Start Mail Merge command is found under the _______ tab. | ||
5. There are _________ main steps to complete a mail merge. | ||
D. Match the following. | ||
1) Synonym | | a) Spelling and grammar |
2) F7 | | b) Personalized letters |
3) Mail Merge | | c) Opposite meaning |
4) Red wavy line | | d) Thesaurus |
5) Antonym | | e) Status bar |
6) English(U.S) | | f) Spelling |
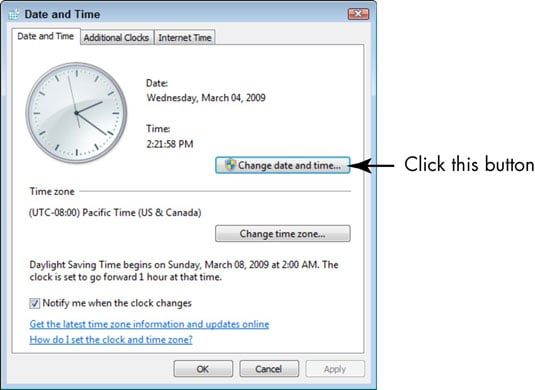
* Updating system clock with Internet time
3. Changing the taskbar settings
The Control Panel is a component of Microsoft Windows that provides the ability to view and change system settings. It consists of a set of applets that include adding or removing hardware and software, controlling user accounts, changing accessibility options, and accessing networking settings. Additional applets are provided by third parties, such as audio and video drivers, VPN tools, input devices, and networking tools.

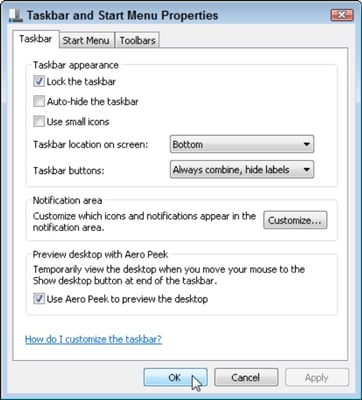
| Setting | What it Does |
|---|---|
| Lock the Taskbar | This keeps you from changing its appearance, such as making it taller to make room for more icons. Be sure you have things the way you want before you lock it. |
| Auto-Hide the Taskbar | This will make the taskbar automatically hide itself when you’re not near it. (Point your cursor at the bottom of the screen to bring it back up.) |
| Use Small Icons | This shrinks the taskbar and its icons to half-height. |
| Taskbar Location On Screen | Choose any of the four edges of the screen. |
| Taskbar Buttons | This tells windows to group similar windows under one button to protect the taskbar from overcrowding. |
| Notification Area | Use this to decide what icons should appear in the notification area (down by the clock). |
| Preview Desktop with Aero Peek | Turn on or off the ability to point at the strip on the taskbar’s far right edge to see under all the open windows on your desktop. |


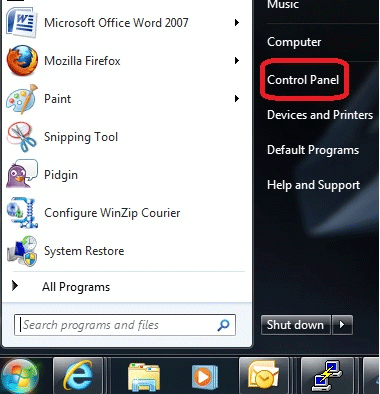
- Click the Start Menu in the lower left corner of the Screen.

- Click Control Panel
- In the upper right corner of Control Panel, if View By: is set to Category, click the drop down arrow next to Category, then select Large Icons.
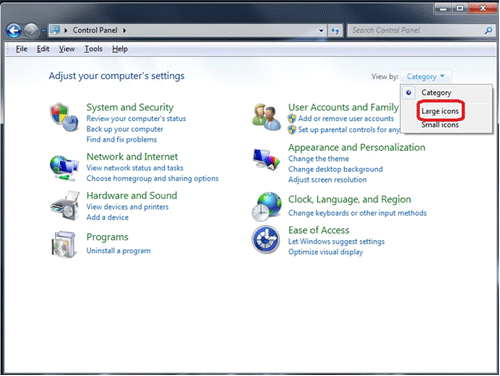
- Scroll down and click on Mouse.
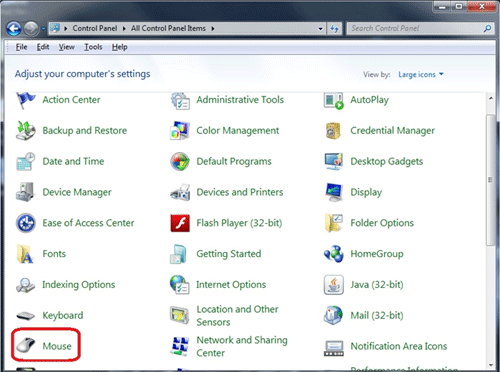
- The Mouse Properties window will open. To change how fast the cursor moves in response to movement of the mouse, select the Pointer Options tab at the top of the Mouse Properties window. Under the Motion heading, drag the slider bar towards slow or fast until the desired speed is accomplished.
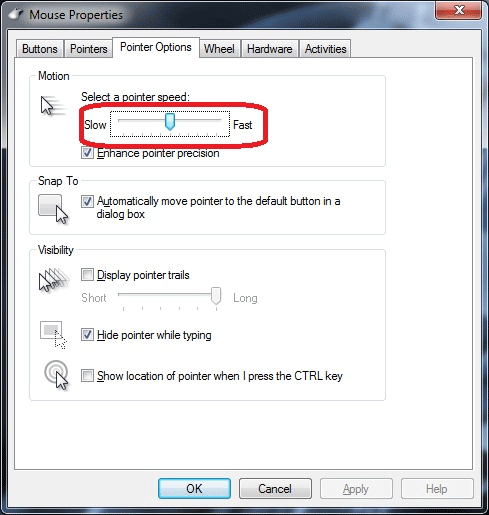
- To change the speed at which the scroll wheel scrolls, click the Wheel tab at the top of the Mouse Properties window. Move the slider bar towards slow or fast until the desired scroll speed is selected.
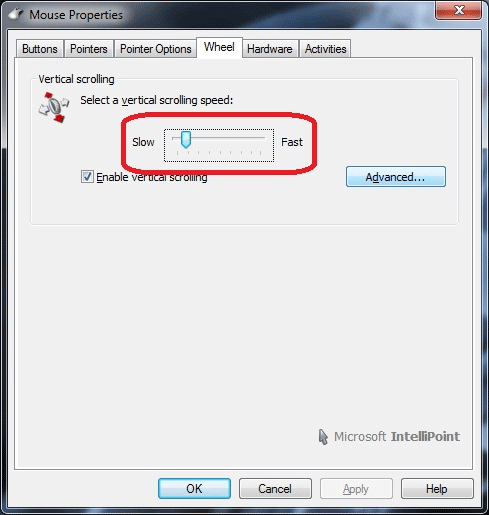
- To change how much distance a fast scroll will cover, click Advanced.
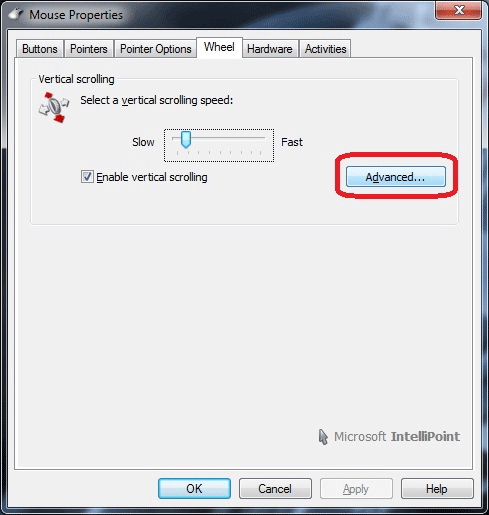
- The Accelerated Scrolling window will appear. Move the slider bar towards slow or fast. This is useful to change how quickly a fast scroll will go through a large document or web page. Click OK when finished.

- To change how quickly two left-clicks will be recognized as a double-click, select the Activities tab at the top of the Mouse Properties window. Move the slider bar towards slow or fast.
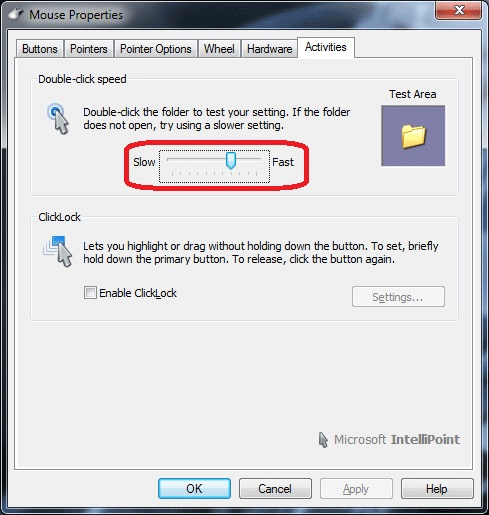
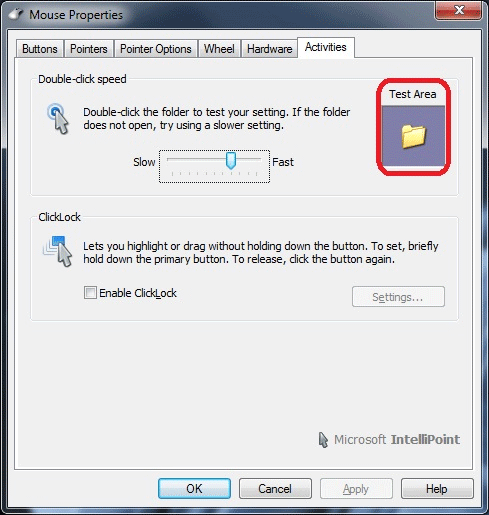
- A slow double-click will allow for more time in between each click in order to be recognized as a double-click. A fast double-click will require little time in between clicks in order to be recognized as a double-click. To test the desired double-click speed, double-click on the folder in the Test Area . When the desired double-click speed is selected, click OK.
A. Choose the correct option from the options given below. | ||
1. Which tab has the option to automatically hide the taskbar? | ||
a) Toolsbar | b) Taskbar | c) Start menu |
2. This tab displays various mouse pointer icons to select from. | ||
a) Buttons | b) Wheel | c) Pointers |
3. The speed of the mouse pointer can be adjusted using the _________. | ||
a) Pointer Options tab | b) Pointers tab | c) Buttons tab |
4. What is the default tab in the Mouse Properties dialog box? | ||
a) Buttons | b) Pointers | c) Pointer Options |
5. What is the default tab that opens each time the Sound dialog box is opened? | ||
a) Recording | b) Sound | c) Playback |
1. Taskbar | a) Display as a menu | |
2. Appearance | b) Start button | |
3. Date and Time | c) At the bottom edge | |
4. Control Panel | d) Taskbar and Start Menu | |
5. Customize Start Menu | e) Notification Arera |
R/1 (Posted on 7/05/2021)
* CU
* MU
4. Memory
Main teaching:
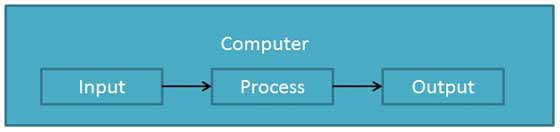
Functionalities of a Computer
Advantages of Computers
- * A Computer is a very fast device.
- * It is capable of performing calculation of very large amount of data.
- * The computer has units of speed in microsecond, nanosecond, and even the picosecond.
Accuracy
- * In addition to being very fast, computers are very accurate.
- * Computers perform all jobs with 100% accuracy provided that the input is correct.
Storage Capability
- * Memory is a very important characteristic of computers.
- * A computer has much more storage capacity than human beings.
- * It can store large amount of data.
- * It can store any type of data such as images, videos, text, audio, etc.
Diligence
- * Unlike human beings, a computer is free from monotony, tiredness, and lack of concentration.
- * It can work continuously without any error and boredom.
- * It can perform repeated tasks with the same speed and accuracy.
Versatility
- * A computer is a very versatile machine.
- * A computer is very flexible in performing the jobs to be done.
- * Computers are used to solve the problems related to various fields.
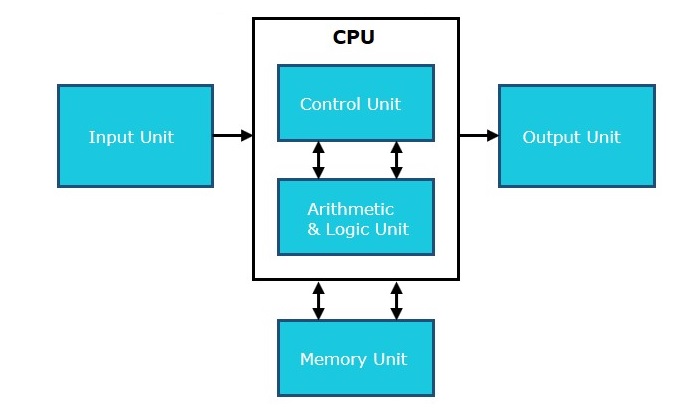
Input Unit
CPU (Central Processing Unit)
- * ALU (Arithmetic Logic Unit)
- * Memory Unit
- * Control Unit
Output Unit
Watch video no. 1
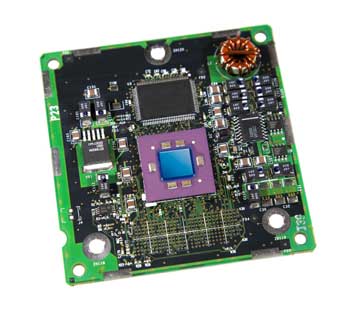
- * Cache Memory
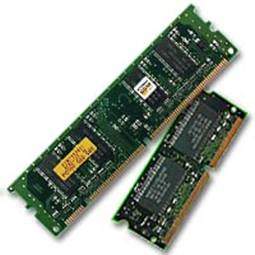
- * Primary Memory or Main Memory
- * Secondary Memory
Advantages
- * Cache memory is faster than main memory.
- * It consumes less access time as compared to main memory.
- * It stores the program that can be executed within a short period of time.
- * It stores data for temporary use.
Disadvantages
- * Cache memory has limited capacity.
- * It is very expensive.
Primary Memory (Main Memory)
 Secondary Memory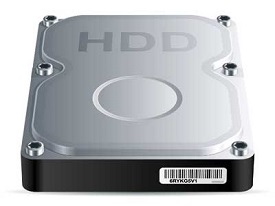
Watch video no. 2
Since the advent of the first computer, different types and sizes of computers are offering different services. Computers can be as big as occupying a large building and as small as a laptop or a microcontroller in a mobile & embedded systems.
Microcomputer
Since the advent of the first computer, different types and sizes of computers are offering different services. Computers can be as big as occupying a large building and as small as a laptop or a microcontroller in a mobile & embedded systems.
Micro-computers are specially designed for general usage like entertainment, education and work purposes. Well known manufacturers of Micro-computer are Dell, Apple, Samsung, Sony & Toshiba.Desktop computers, Gaming consoles, Sound & Navigation system of a car, Netbooks, Notebooks, PDA’s, Tablet PC’s, Smartphones and Calculators are all type of Microcomputers.
Minicomputer
Popular Minicomputers
- K-202
- Texas Instrument TI-990
- SDS-92
- IBM Midrange computers
Mainframe Computer
Popular Mainframe Computers
- Fujitsu’s ICL VME
- Hitachi’s Z800
Supercomputer

RANK | SITE | SYSTEM | CORES | RMAX (TFLOPS/S) | RPEAK (TFLOPS/S) | POWER (KW) |
1 | National Super computer in Guanzhou, China | Tianhe – 2 (MilkyWay – 2) | 3,120,000 | 33,862.7 | 54,902.4 | 17,808 |
2 | DOE/SC/Oak Ridge National Laboratory, United States | Tianhe – 2 (MilkyWay – 2) | 560,640 | 17,590.0 | 27,112.5 | 8,209 |
3 | DOE/NNSA/LLNL, United States | Tianhe – 2 (MilkyWay – 2) | 1,572,864 | 17,173.2 | 20,132.7 | 7,890 |
4 | RIKEN Advanced Institute for Computational Science (AICS) Japan | Tianhe – 2 (MilkyWay – 2) | 705,024 | 10,510.0 | 11,280.4 | 12,660 |
5 | DOE/SC/Argonne National Laboratory, United States | Tianhe – 2 (MilkyWay – 2) | 786,432 | 8,586.6 | 10,066.3 | 3,945 |
1. ALU performs the calculation and sends it back to the ____. | ||
a) CPU | b) memory | c) CU |
2. Which memory is also called main memory? | ||
a) Secondary | b) Primary | c) Computer |
3. Which of the following is called non-volatile memory? | ||
a) ROM | b) RAM | c) Secondary memory |
4. Both read and write operations on data can be performed on .... | ||
a) ROM | b) RAM | c) both ROM and RAM |
5. Which of the following can execute billions of instructions per second? | ||
a) Minicomputer | b) Mainframe | c) Supercomputers |
1) RAM | a) PRAM | |
2. ROM | b) High-speed memory | |
3) Mainframe | c) Execution | |
4) Cache | d) Operation | |
5) ALU | e) Large memory | |
6) CU | f) Temporary | |
7) Supercomputer | g) Non-volatile memory |